We are a young couple remodeling our first house...one outdated / ugly thing at a time. This blog documents our remodel projects and ideas.
RSS

6.30.2011

Tied Up Sides

Round 4 - tied up sides. This is the most risque t-shirt remodel this week and the final product will show some skin...unless you wear a cami. Make sure the shirt is not fitted because tying up the sides will make it fitted. And I am using a long sleeve shirt that I picked up for $1 thinking that it was short sleeve.

Step 1 - Lay the shirt out flat. If you want, cut the sleeves and the neck. I cut off both the neck and the long sleeves.

Step 2 - Cut in perpendicular about an inch along the side seam. Too technical? Just cut towards the center of the shirt from the side. Make the cuts about half inch to an inch wide. Like so:

Step 3 - Cut off every other strip. You could leave every strip, but it gets hard to tie every single one. I found it easier to tie every other one.

Step 4 - Then separate the front and back of the shirt by cutting the strips along the seam.

Step 5 - Tie the two corresponding side strips together.

Step 6 - Stretch out the sides of the shirt by tugging on it. Be careful to not pull too hard and rip the shirt.

Step 7 - Wear it!

Yes, I am crooked. Blogger hates me today and will not upload the pictures correctly. So, everyone just turn your head to the side. And you can see the skin I mentioned earlier. However, if you put a cami on or even a long sleeve shirt in the winter, this shirt will have a G rating instead of PG-13.

Next week = regularly scheduled DIY projects.

Braided T-shirt Scarf

Round three of t-shirt remodeling - braided scarf. Another easy, all season scarf tutorial. The instructions are similar to the circle-scarf, except the circles in this scarf are cut and then braided. And, I finally graduated to a cutting mat and rotary cutter. Go me!

Step 1 - Lay the shirt out flat and cut the bottom hem off. Then cut straight across the shirt right under the arm pits.

Step 2 - Cut the shirt into 1 inch strips

Step 3 - Stretch the strips. Leave one strip to the side and don't stretch it.

Step 4 - Then cut the strips so the circles are broken.

Step 5 -  Leave about 6 inches of fringe and then begin braiding. I used a clear pony-tail holder to secure all the strips together. And then I put the strips under the edge of a table to hold in place while I braided.

Step 6 - Braid the strips. Leave about 6 inches of fringe at the end.

Step 7 - Secure the two ends together with the extra strip from step 3.

Step 8 - Wear it! - No pics. I had been working outside with no makeup and I'm not about to take a pic to put on the internet looking like that! But maybe I'll take a few pics tonight and update.

And - I almost lost a finger to the rotary cutter. That thing is sharp! My finger was nothing to it. So....maybe I haven't graduated yet.

6.28.2011

Slitted V-Neck

Round two of t-shirt remodeling - making a slitted v-neck. My fitted t-shirt is getting changed from a round neck to a v-neck. Here is the easy how-to so you too can have a v-neck.

Step 1 - Cut the band off from around the neck of the t-shirt. I also cut the sleeves off to make it a tank. If you don't want a tank, leave the sleeves. But it is hot, hot, hot here and no sleeves are mucho bettero.

Step 2 - Fold the shirt so that the two side seams are together and the front of the shirt has a fold down the center. If this completely confused you, just check the next picture for a reference.

Step 3 - Find something with a straight edge and place it on the shirt where you want the v-neck. The farther down the shirt you place the straight edge, the deeper the v will be. I used a dvd case as my straight edge.

Step 4 - Cut straight slits from the fold to the straight edge. Make the slits about half an inch wide.

Step 5 - Stretch the slits.

Step 6 - Wear it! And yes, I am a nerd and had to take photos of the shirt using a mirror. A girl has to improvise when home alone - and I sure don't think Paris or Baby could have taken the pictures.


Another free t-shirt remodel. I love the v-neck since it is much cooler than having the t-shirt right around my neck. And the slits just make it a little rocker-chic without showing too much skin. The best part is that you can decide how deep to make the v. I am not brave enough to have a deep v, but if you are then more power to you! And bonus points if you can name what movie that dvd case is for.

6.27.2011

Remodeling T-shirts

                              *Warning - lots of pictures*
I am taking a break from blogging about the house remodel this week - life is getting in the way and I haven't actually completed many projects lately. Instead of the house, I'm going to talk about remodeling some of my t-shirts. I have fallen out of love with some of my clothes and decided to spice up my closet a little for zero dollars. The only thing you'll need to remodel some of your shirts is a pair of scissors and a few cotton t-shirts.

First project is a circle-scarf. (I don't know what the technical name is for this scarf.) And this scarf is actually what began all the t-shirt remodeling. I saw this neat scarf online and thought it was perfect for all seasons:
dusty blue w/ brown print necklush

That was until I saw the $42 price tag. Gulp. I don't like it that much. But, being the thrifty person I am, I had to make one for myself. And, being the nice person I am, I'm showing you how to get your very own circle-scarf. *Make sure your shirt does not have a side seam. Also, the larger the size of the shirt, the longer the loops will be.* For this project, I'm using a large shirt. And I did this project while sitting on the couch watching TV, hence Baby in just about every picture.

Step 1 - Lay the shirt out flat and cut the bottom hem off. Then cut straight across the shirt right under the arm pits. You will have a tube:

Step 2 - Cut about 1 inch strips. These don't have to be perfect, just cut.

Step 3 - Stretch out the strips. Place one strip to the side and don't stretch it. You can see how uneven my cuts are.

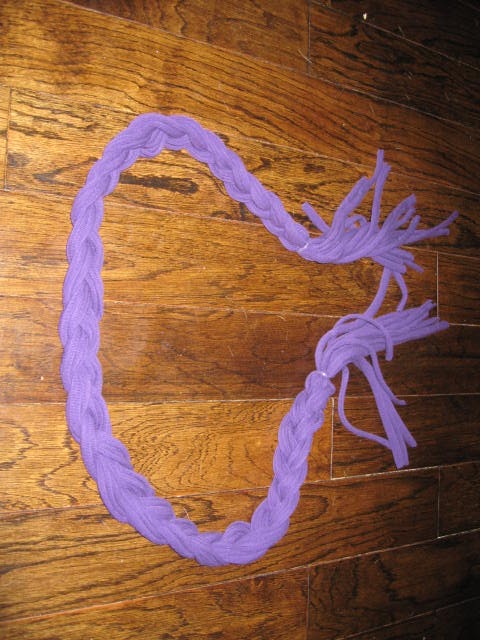
Step 4 - Even up the loops and tie them together with the unstretched strip.

Step 5 - Wear it! There are a lot of different ways to wear this scarf. Here are a few of my favorites.

Long Circles:

Double-wrapped:

Scarf:

Tied:

And the best part is that this was free! I just cut up a t-shirt that I never wore. It is also great because it can easily be made while chilling on the couch - it is 100 degrees outside. Now y'all go make some circle scarfs.

6.24.2011

Bubble-Buster

Do you ever have a really great idea in your head, and then when you make it...it doesn't look all that great anymore? Everyone raised their hand, right? If not, just humor me. This is exactly what happened to me with the art for the sun room. Let me explain. Here is the sun room:

It is is mostly a large window, french doors, and built-ins...with a little wall space. (The little wall space can barely be seen in the above photo. It is along the same wall as the built-ins) So I have been thinking about what to do with the little wall space for awhile now. I originally wanted to do an asymmetrical mirror arrangement. But the hubs said no because of the other two asym arrangements already in the house. And then I thought that I had settled on some sort of paint chip art - I even started collecting paint chips from the store.

But that thought quickly changed when I found three over-the-door type mirrors for $5. Yes, all three for $5. Hello! I can hang them horizontally and capitalize on the light in the sun room. Perfect...or so I thought. I hurried home to start hanging the mirrors.

I used double-sided foam tape to hang the mirrors. I thought that if I did like them, I could always secure them better to the wall later. Which if you are still reading, you know I that I never got around to securing them better. Anyways, here is the wall with one mirror:

Not bad, but not good either. So I added another mirror:

Yuck! I am not liking this at all. Cue the womp-womp let down sound effect. I didn't even put the third mirror on the wall. One more mirror on the wall would be one more I would have to take down. What a complete bubble-buster.

Now I know that cheap mirrors still look like cheap mirrors when hung on the wall. Back to square one - what to do with the wall in the sun room............

6.23.2011

Playing Grown Up

Remember when I made the Mr. & Mrs. art? And remember how I said we had a little fun with the mustache cutouts? Well, I'm back to report in on that fun.

I printed out three different sized mustaches since I didn't know which would be best for the frame. And after making the Mr. art, I made the other two mustaches into photo booth props, it is really easy to do - just glue a small dowel rod to the back. With the mustache props ready to go, the camera came out.

The plan is to use a photo of each of us and make a family photo grouping. I think the grouping will either be clipped to a string, or put a photo in each pane of a window (one of the free ones). I will have to report back in on how I decide to display the photos. Anyways, these are the ones that made the cut:

Great looking family, huh? I know. I am quite lucky. And then here are some of the best out-takes. Mostly these involve the kids not cooperating. Like Merlin with his eyes closed:

Or Paris hiding her ears:

Or Baby trying to not look at me:

And me, hamming it up for the camera:

Yep, we act like kids around here and probably need adult supervision. I always say that we are "just playing grown up" and "subscribe to Less Fear, More Fun".

So - what goofy photos have you taken lately? Any mustache family photos in the mix? And who thinks that the hubby needs not a mustache?! He looks like he could easily be the butcher in Gangs of New York... watch out Daniel Day-Lewis.

6.22.2011

This Is Progress?

Sad news - the old house that gave me the last freebies is a goner. It was demolished and now there are only large trees on the lot. I know that some people see this as progress - an "eye sore" is gone from the street. However, the Victorian-house-lover in me cried when I drove past the empty lot. Yes, the house was in a dilapidated state...but it had soooo much potential and could have been a shining star with a little love. It sads me to know that a house with so much history could just be torn down. I guess it is the optimist in me, always thinking that junk is a treasure.

You probably don't remember, but way back when I started the blog I posted about my parents' house. Their house was also condemned and about to be torn down when they rescued it.  But, you would never know that now and my childhood home is a true gem.

Anyways, I'll get off my soap box now. This is how the house looked when it was still standing:

And, compliments of my mom's iPhone, here are some action shots of it being torn down:


Also on the sad news front - the tornado house is also gone. It was torn down a few weeks back. However, this house was in bad shape due to a natural disaster so this demolition might be excusable.

I sense a trend here... free items = torn down house. Not a trend I want to continue to support. Do I have to stop finding freebies? I sure hope not.

6.21.2011

Lamp Saga

Yes, this is a saga. A long, trying, lip-biting, I'm-so-mad-I-could-throw-it saga. It begins when I fall in love with a $1 lamp at a yard sale. It was oh so cute and reminded me of the Pixar lamp...the very filthy cousin to the Pixar lamp. This poor guy was beat up:


But it oozes potential. And I am always up for a cheap fixer-up so this $1 lamp came home with me. After scrubbing the dirt and who-knows-what off the lamp with a magic eraser, it was time for spray paint. I painted the lamp a rich plum color...and spiced it up by painting the inside of the lamp lime green.

This part was easy. They saga part began when I tried to put the lamp back together. The original cord, if you can call it a cord, was literally in pieces and a major safety concern. I thought I would take the easy route and use an extension cord as a new cord.

Nope, not going to work. The extension cord is too fat to fit through the bendy neck of the lamp. I found this out after cutting the end off the extension cord. Easy route = fail.

Next I tried the second easiest route - a lamp cord with the plug end already attached. Guess what? This didn't work either. After feeding the cord through the lamp from the bottom, I realized that the cord has to be fed from the top...which means that the plug end can't be attached to it. I would have to attach the plug after I got the cord through the lamp. Fail again.

By now, I am mad. More mad at myself for wasting time feeding cords through the lamp and not making progress. But I now know that I have to feed the cord from the top and attach the plug at the end. Seems easy enough. Until I get the entire thing wired up and ready to go and realize that I forgot to thread a tightening nut in the wiring process. And you know what happens when you forget that nut? You get a sad lamp.

And another fail! Really?! My love for this lamp was almost empty and I was about to throw it in the trash. But I decided to step away from the lamp and leave it alone. So it has now been about two months and the lamp is still laying in the corner of the guest bedroom in its sad state.

I have all of the stuff to fix the lamp, I have just ran out of "want to". Hopefully I will get motivated to finally fix the lamp and show it off. Until then, it will stay in the corner.