We are a young couple remodeling our first house...one outdated / ugly thing at a time. This blog documents our remodel projects and ideas.
RSS

3.30.2011

Guest Room Curtains - Revisited

I really love the tree branch curtain rod I fixed up for the guest bedroom. And the curtains look good too with the new ribbon ties. However, I still thought something was missing. Duh, of course. I didn't make any curtain tie-backs. Well, I have an easy fix for this problem - one of the old tab tops and some remnant tassel trim.

Remember when I trimmed off the old tab tops and replaced them with ribbon?

I used two of the tab tops, one for each tie-back. Then I cut a piece of the remnant tassel trim and added it to one end of the tab. Finally, add a little velcro to each end. Instant tie-back.

So easy. And that got me thinking. I had enough of the remnant tassel left to trim out the top of the curtain. So I did - with my trusted steam-a-seam since my sewing machine is at my mom's house.

Well, what do you think? Do you like the tassel trim? Or is it too much? I think it is really cute, but leaning towards too much since the ribbon has a little polka dot pattern. I need help people. With or without?


3.28.2011

Spray Paint + Mod Podge = Best Friends

I'm back, reporting in on another super easy, super thrifty, super cute makeover. The lucky makeover item this time is a thrift store tray. Doesn't it just scream h-e-l-p:
 Yep, I thought it needed a funky makeover. Rustic wood and a deer silhouette...no thank you! This little tray is going to get the works - spray paint and mod podge. And the best thing is that I already have all the supplies, so this $1 tray makeover only cost $1. First I sprayed the tray a bright blue....and sprayed...and sprayed. I think it took 4 coats to get the bare wood completely covered since it kept soaking up the paint. I probably should have primed it first.
 The tray already looks 100 time better, but still not good enough. After the tray was dry, I cut a piece of leftover fabric to cover the deer silhouette. I really didn't want to see that anymore...not really my style. And after the fabric was cut, it was time for phase two - mod podge.
 I covered the bottom of the tray with mod podge and then stuck the piece of fabric down. Then I gave a good coat to the top of the fabric. Set the tray to the side and let it dry.
After the mod podge dried, I added one more final detail to the tray - a thin strip of ribbon around the bottom of the tray. This really crisped it up and made it look more finished. I hot glued the ribbon and then added a final coat of mod podge to the entire tray.


One dollar, that's it. Spray paint and mod podge really are best friends.

3.25.2011

Project Fail

Insert sad music. I failed on a project. But I am not too proud to share this failure. I actually hope that someone will be able to tell me how to do this better next time. That's what friends are for...

I failed at glass etching. And the sad thing is that I thought it was going to be super easy. I have a jar that holds my paint pens and wanted to spruce it up a little with some etching detail. So I bought a $4 kit from the craft store and thought it would be fun to try. This is one piece of the kit:

I cleaned the glass with the stuff in the kit and then taped on my stencil.

Then I sponged on the frosting goo. I could instantly tell that this project was failing. When I looked at the stencil from the inside of the jar, I could see the frosting goo was under the stencil! No!!! It was too late. I tried pushing down the stencil, but the damage was already done.

Of course, when I removed the stencil, the pattern was blurry at best. I actually looked like I finger painted the pattern onto the jar. I failed. But I am still using the jar as a paint pen holder.

I know that the stencil needs to be tighter to the jar. But what else went wrong? Have y'all ever frosted glass with this kit? If I want to etch more glass should I just bite the bullet and buy the fancy air blaster etcher kit?

3.23.2011

Repurposed Suitcase To Dog Bed

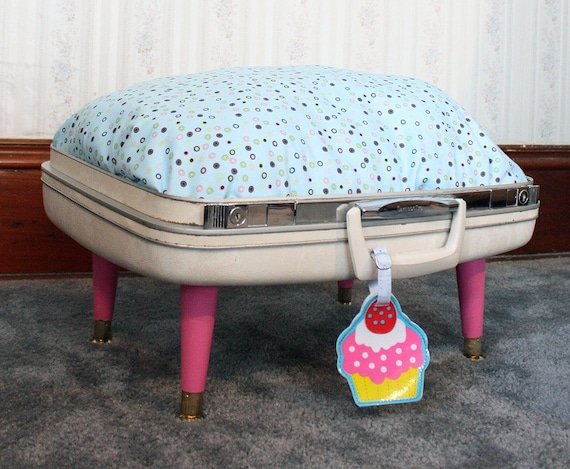
While browsing etsy the other day, I saw the cutest dog bed ever. It was an old suitcase that they repurposed into a pet bed:
SnuggyLuggage Suitcase Pet Bed Vintage Upcycled Cat Dog Pink
Esty Seller
Oh em gee! Who would have thought a vintage suitcase could ever look so cute? I wanted one. I don't know why...my dogs sleep on the couch. Let me rephrase that - they have taken over the couch and it has been like that for years. I'm ont going to change them now, but I still wanted this pet bed. However, my wallet won't let go of $50 bucks that easily, especially when I could DIY this.

So that is exactly what I did. I found a great olive green suitcase at a thrift store for $5. And when I was at my parents' house this past weekend, my sweet dad pried apart the hinges. Then we cut apart the binding and had two suitcase pieces. Then my dad used some left over staircase spindles to make legs. He drilled through the bottom of the suitcase into the legs and used a nut to attach them.

As for the cushion, I used a $2.50 pillow from Wal-Mart and sewed a cover for it. And I used velcro on one end so I can take the cover off to wash it. Can you ever guess what material I used for the cover? The same as the lamp shade and the stool....and I still have a little left over. Anyhoo, onto the finished dog bed pictures.

There it is. Cute, huh? And this is the top piece of the suitcase so I still have the bottom piece (the one with a handle) to make into another pet bed. I love that the spindle legs compliment the vintage suitcase. I could always spray paint the legs if I ever want a quick change.

And one final picture of the bed with Paris trying it out.
She looks like a possum in this picture! She had gotten her summer hair cut that morning and just got out of the bath when I took this picture. Please excuse her wet hairdo. Although, I think she is cute enough to pull it off.

Project Cost Breakdown:
Suitcase       $2.50 - since I can make two beds out of one
Legs             $.50 - had to buy a few nuts
Fabric           $0 - already owned
Pillow            $2.50
Total            $5.50

Double woot!  Everyone is getting suitcase pet beds for Christmas this year! Thanks etsy for a great idea! And much thanks to my super-dad for his help on this project for his grand-dogs.

And.....Action!

Hello everyone! Long time no talk. I took a weekend off from blogging and work and spent it at my parents' house. You might be thinking that I didn't do anything or have anything to report on. Wrong! My parents (yes, both mom and dad) and I crafted and sewed and thrift store shopped and painted the weekend away. I have at least a week worth of projects up my sleeve. First up, is this director chair overhaul.

$2 at a garage sale, consider it sold. And since I plan to use some on sale fabric and spray paint, this will be a thrifty chair makeover. First I took it apart and painted the frame a pale yellow. Sorry for the bad photo. Bright sun and my iPhone don't get along well.

Then I used the existing canvas pieces as a pattern for a new back and seat. I bought some duck fabric on sale for about $4. It is a really cute pattern and perfect for this chair. So after a trial and error sewing session, I had the new back and seat made. I put the chair back together and was tickled with how funky it looks. I love it!


Much better than the faded black canvas and bare wood before.

Project cost breakdown:
Chair              $2
Fabric             $4
Spray Paint     $2
Total               $8

I love a cheap makeover. And this is just one of many completed this past weekend. I have many more thrifty projects to share in the next few days.

Have you scored any great garage sale finds lately? Have you made over a director chair too?

3.18.2011

Piddly Projects

I don't know what has happened to me recently, but I have not been dedicated to remodeling the house lately. Shameful, I know. Instead, I have been stowed away in the guest bedroom making piddly art projects and playing with Mod Podge. So, I thought I would show you a few of the piddly projects I have dedicated my attention too.

First up is a recycled cabinet door that I made into a menu chalkboard. I painted the cabinet door a fun yellow and then painted the inside of the door with chalkboard paint. Then I cut circles of scrap book and mod podged them onto the cabinet door. Finally I painted a letter onto each circle.


Next up is the starfish garland. I was super excited to find a basket of 6 starfish for $6 at Big Lots. Go run out now and buy one because that is cheap! I took three of the starfish and made some garland out of jute. I put a dab of hot glue on the back and then wound the jute around the starfish three times. Hot glue it again into place and then go about 9 inches up the jute and repeat the hot glue to add another starfish. You can add as many as you want. I draped the garland over the guest bath mirror.


I also made the much-blogged-about coffee filter wreath. And although it is cute, I probably won't make another one. Between the burned fingers and the time factor (it takes a while to fold the coffee filters and glue them all individually) I got bored quickly.

So there you have it, three piddly projects I made this week. Now, go forth and make your own piddly projects. It is okay to take a break from remodeling every once and awhile. And since this is three projects, am I excused from blogging for three days? I'm actually going to be out of town for a few days, but I'll try my best to post while I'm away.

3.15.2011

Leftover Makeover

It has been a long day since I drove for 6 hours and then worked too - this won't be a long post. But that doesn't mean that I didn't do a project when I got home. I picked up this lamp at a flea market for $3.
It has a great shape, just needs a little TLC to make it shine. And I knew exactly what to do. Remember the stool that I made over recently? I had enough fabric left over to cover this lamp shade, so that is what I did.

First I taped the cord and socket up with painter's tape. Then I spray painted away the brass to a rich emerald green.

While the lamp base was drying, I covered the lamp shade. I laid out the fabric and sprayed some glue onto it. Then I placed the lamp shade on the fabric and rolled it up like a burrito, making sure to keep the fabric tight and smooth.

After the fabric was around the lamp shade, I trimmed the fabric leaving about half an inch around the top and bottom. Then I used my hot glue gun to glue the extra fabric into the inside of the lamp shade.

Final product:

Isn't it so cute now? Not too bad for $3 and some leftover fabric. However, just like the stool, I need a place to put it. Put this post down on the shortest blog post list - this girl is pooped.

3.13.2011

One Lone Girl + One Ugly Bath = REMODEL

So what is a lone-ranger girl to do on a weekend when there is no hubby around? A surprise remodel of the guest bath, of course! I think the post title gave it away. Anyhoo, I remodeled the guest bath in one weekend, all by my lonesome and the hubby had no clue what was coming. Yes, you read that right. I remodeled the bath on a whim. Well, we were going to get around to remodeling it anyways, so why not just do it?!

But before I get to talking, here is the bath on move in day:

And this is what the bath was looking like when I started remodeling it:
Not much change from day one. I changed the curtain rod to a curved one and added a plant. So, about the remodel. I had already purchased the vanity on the last IKEA trip and it was sitting in the guest bedroom waiting to be put together. I had also found a great deal on porcelain 13x13 tile so I bought enough of it to do both baths and the laundry room - they even threw in a free tile saw! And we already had the tiling supplies from the fireplace surround project. See what I'm getting at....I had everything for the remodel just sitting around the house ready to go. It was a sign that I was supposed to remodel the guest bath.

Thursday night - Demo. The vanity, tile, mirror, light fixture and toilet had to come out. The tub/shower insert would stay since it is in good condition. First to go out the door was the vanity. And I got a pleasant surprise when I removed the vanity - the tile did not go under it. This made it much easier to rip up the old tile because I had a starting point. Then it was toilet time. I'm not a big girl, but I am determined. I man-handled the toilet into the hallway and set it on some old towels and cardboard. Finally I took down the mirror and gold fixtures. One large garbage can of torn out tile and a stiff back from toilet moving later, and the demo was done. Time for bed because I had to work Friday.

Friday night - Sheet rock and Tile. Since the new vanity isn't as large and won't touch the wall, I had to repair some of the sheet rock. I used mud and floated the wall a few times. Then it was tiling time. Using the same method as I did with the fireplace surround, I was able to lay the tile. I decided to lay the tile in a brick pattern instead of straight to help camouflage any errors, after all I'm not a professional. I marked the center of the room and started tiling from there. It was really quick going. The hardest part was cutting around the toilet. I am too picky and made the tile fit perfect around the toilet flange instead of just box cutting. All the other cuts were straight and the new free tile saw made the job much easier. I finished up laying the tile and hit the sack.

Saturday - Paint and Grout. I'm not the best sheet rocker, but after a few coats of mud and some sanding, the wall was ready to be painted. I already had the paint so I rolled on two coats of paint. Once the wall was painted, I was ready to grout the floor. Grouting is easy. Just work it into the grout lines with the float, kind of like spreading peanut butter. Then smooth the grout with a sponge and clean up the excess. I started in the back corner and worked my way out of the room. For the rest of the day, I didn't go into the bath. I wanted to make sure that the grout and tile would cure well and look good. But I was able to put the vanity together in the living room and do some shopping around town for a few accessories.

Sunday - Finish. Sunday was dedicated to cleaning up and getting the bathroom put back together. I moved the vanity in place and hooked up the faucet. Of course I didn't have all the parts, so I had to stop midway and make a trip to the hardware store. Then I installed the toilet. Guess what? It worked and didn't leak! I didn't know I was a plumber too. Then I installed the mirror and hung the shower curtain. And I had just barely finished when the hubby came home. This is what he saw:
It might not look like a big change, but it was a one weekend, one girl remodel. I am so happy with the bath, so was Russ. He was shocked that I had remodeled the entire bath by myself in a few days, but he also said he wasn't surprised. I am notorious for tackling projects while the hubby is away. I think he goes hunting on the weekends just so I'll finish the house projects and he won't have to.
I am going to apologize for the lack of during pictures. I was busy. I know, that is not an excuse but it all I can say. I didn't take any during pictures and regret that.

3.09.2011

Limb-Rod, Not A Nimrod

Things aren't always what they seem. It might look okay, but it is probably held together with gorilla glue, or has tin foil as a crack filler (insert junior high giggle here), or taped together. I just spilled all of my DIY/remodel secrets. And the curtain rod in the guest bedroom is no exception. From afar, it looks like any normal curtain rod. However, upon a close-up inspection, you'll notice that painters' tape holds the finials onto the rod. That is because the rod ends broke when we moved into the house and I was too cheap to buy a new curtain rod when I could "fix" this one. Now that is cheap folks. Also, the curtains are tab-top which didn't work with the existing curtain rod height.

Well, with a new built-by-me desk, new built-by-me headboard, and new bedding, I thought it was over-due time for a new curtain rod. But I could not find a rod I liked despite shopping both online and in store. They were all plain and a little boring while I wanted something more fun. So after measuring the window by arm-length, it is a proven scientific method, I took to the front yard to make my own curtain rod. Yeppers, I sawed off a small limb from the oak tree.  My neighbors probably think I am crazy - a girl in high heels, sawing off a limb with a mitre box saw. Little do they know that my crazy antics are actually thrifty DIY projects.

A few minutes later (it was slow going with the mitre saw) I had a perfect branchy limb. And after removing the small branches and sawing off a few gnarly knobs, the limb really looked like a curtain rod. Two coats of white spray paint later and I had a free curtain limb-rod! I used the existing curtain rod hangers to hold up the limb. I propped the limb up on top of the hangers and then used some white twine to tie the limb in place.

As for the curtains, they needed a makeover as well. I picked up the chocolate tab-top curtains for $2. However, the tab-top didn't work previously and won't work with the limb. The best thrifty fix I could think of was to use ribbon to tie the curtains to the rod. So I cut off the tabs and then hot glued pieces of ribbon onto the curtain. I can now hang the curtain level even though the limb-rod is not straight. Go me.

Ready for a picture of the new limb-rod in action? Wait no longer, here it is:

Total window makeover project costs - $3.
Limb                   $0
Spray paint         $0, already owned
Curtains              $2
Ribbon                $1, 50% off at hobby lobby

Three dollars! Cheapest window treatments yet. Even cheaper than the sheet-curtains in the man cave. I was inspired to make the limb-rod because of the pattern in the new bedding. It has a branch theme so this limb-rod is perfect. I think I really brought the outdoors in with this project.

Cha Cha Cha Changes

I have been sharing more craft projects on here recently and thought it was time for a house update. After all, this is Remodel This House, not Craft This House. So, how about I share the living room?! You have only seen the living room like this:
That photo brings back some memories...great memories since this is our first house. And we have done quite a lot of remodel work in this area. Here is the project run-down list: ripped up carpet, installed hardwood floors, refinished hardwood, replaced ceiling fan and light fixtures, tore out the built-ins, removed the fireplace hearth, tiled a new fireplace surround, built a mantle, frosted the side lights, and replaced the gold with brushed nickel. Whew! We've been busy bees. Check out all the juicy details on the project page.

Now for a recent picture:
Um, yep. It is slightly different than the before picture. We got a new temporary couch, an entertainment center, coffee table, and a few decor items. Now for the run-down of the new items.

The entertainment center is from IKEA, my favorite 6-hour-drive-away store. There are six separate cubes that make up the unit. This is great because if I ever want a change, I can break up the unit into individual pieces. And the storage space is wonderful compared to what we had - an open tv stand which was reused in the man cave. The coffee table is a cheap Lack table, also from IKEA. I couldn't pass up the $20 table, on sale.

The sofa is temporary. It will eventually  move to the sitting area in the bedroom when I find a sofa I like for the living room. This sofa is actually modular so I can have a love seat and chair, or a sofa. Perfect for the sitting area, but not-so-perfect for the living room.

And this is the other side of the living room. The little bit of wall you see on the bottom right is the same wall that the entertainment center is on.

Yay for changes! My house is constantly changing. Every day. I am always updating something, or spray painting an item, or repurposing a thrift store find. You get the picture, it is constant changes around here.

3.08.2011

No Walk In The Park

Remodel This House first came to the blogging world on November 10, 2010. So that makes us (the blog, not me) about 4 months old, and a lot has happened since the beginning. Projects have been featured on Curbly, Knock Off Decor, DIY Life, and numerous other blogs and sites. I have been truly blessed with some great friends that choose to follow me and read along everyday - hey y'all!

But what I really want to say is...this blogging thing is no walk in the park! I love writing about my escapades in home remodeling and sharing my house with the world. However, it is tough too because I work a 40 plus hour job (and I'm on call after hours) and then try to do home projects and blog about them in my "free time".  I'm doing my best over here trying to keep the blog fun and informative.

Anyhoo, I thought this was a great time to post this get to know me survey I was emailed. You have seen my house and read a little about me; however, this will really tell you who I am...maybe.

What is your occupation right now?      Emergency Manager, part-time blogger, wanna-be-designer
What color are your socks right now?      Not wearing any
What are you listening to right now?      My dog, Paris, squeaking her toy
What was the last thing that you ate?      Lindor truffle, so good
Food you hate?      Easy – mushrooms, fish and bananas.
Can you drive a stick shift?      You betcha!
Favorite sport to watch on tv?      College football – Woo Pig Sooie!
How old are you today?      26
What is your favorite season?      Fall
Cherries or Blueberries?      Blueberries definitely
What is on the floor of your closet?      Oh man, this had to be asked.      Too much. Clothes, shoes, purses, etc.
What did you do last night?      Gave my dogs a bath, very fun night
Favorite dog breed?      Pomeranian! Mt. Feist is a close second.
How many states have you lived in?      Just one – good ol’ Arkansas
What is your favorite flower?      Tulips or lilies

So that is a few short and sweet Q&A's about me. Have anything else you want to know about me? Ask away. I love to talk!

3.06.2011

Party in the Pantry

I am so happy to say that my house no longer suffers from two-color-only-walls! I have wanted to slap some fun color on the walls since we moved in and I finally found the perfect place - the pantry. And I could go wild in the pantry since it is behind a closed door. Oh, the possibilities. Why hadn't I thought of this earlier?

So with my mind in color-induced happiness, I headed off to the hardward store to pick the perfect color. I thought I wanted an orangy color, until I found a smoky-gray-blue in the miss-match paint section. Priced at $5 a gallon, I was sold.

Once the pantry was cleaned out, I noticed that it was painted two different shades. And these are not two pretty shades of paint. No, the paint is dingy and boring. Witness the ugly bare pantry:

And I know everyone loves a messy house picture, so here is what my kitchen cart looked like with all the pantry goods:

I didn't do anything fancy while painting. I just cut in the edges with my trusted short handle brush and then rolled what was left. I only painted the walls, not the shelves or trim. It was really quick going and took about one hour to paint it all and put down the shelf paper. Speaking of shelf paper, I also used what was left from the K-cup project to cover the shelves.

Doesn't it look so much better already? I'll assume the silence I hear is a "yes". I love how much change a quick coat of paint makes. And $5 miss-matched paint is all the better. So here is the pantry loaded back up with all the food:

Love it! Oh - the floor in the pantry used to be linoleum. We ripped out the old linoleum and replaced with hardwood to match the kitchen. And the pictures make the paint look more blue-green than in person. I really need to learn how to use my camera. One more note, my hubby loves the paint! I think that might be a green light to paint a few other walls around the house. Maybe not entire rooms, but I have some plans floating around in my head.

Have you recently painted or organized your pantry? Do you have a one-color house?