We are a young couple remodeling our first house...one outdated / ugly thing at a time. This blog documents our remodel projects and ideas.
RSS

10.24.2011

New Web-Home

Hey everyone! I am sorry for the long, long delay in posting. Life has gotten a little crazy since I am starting up a new business. And with all the life-changing decisions actually beginning to take form, something has to give. Sadly, it is this blog. However, you can find me at my new web-home - lavishyou.com.

I started Remodel This House for fun and to keep me busy on the house, a mix of journaling and accountability in one. Blogging has been a true joy, plus I met a lot of sweet people who are all so talented. Putting RTH on a blogging-freeze is bitter sweet.

Before I signed off, I thought I would share the future plans - just in case you are curious. They are just plans, which are subject to change.
  • Sell our house
  • Move closer to hubby's work
  • Open Lavish store-front
  • Kick butt and take names
Okay, so they are very generic plans. But you get the idea of where our life is heading. Hope to see you around the interwebs! If you have any questions about any projects, ideas, etc., email me!

xo,
Bethany

9.27.2011

$50 Gift Card GIVEAWAY!!!

I'm giving away a $50 gift card for Lavish!


To get your name in the hat, just like me on Facebook. And if you share or report the giveaway on your page or blog, you can get two entries!

You can use the money towards anything on Lavish or on Facebook - which I will start posting pictures of new items for sale in an album on the Facebook page. You can also use it for a custom order or at Dazzle Daze show (if you are in Central AR.)

Get to liking and sharing so you can win! Good luck!

New Gear

Sorry for the week long delay. I am still around, just not posting lately. Shame on me! But I do have a good excuse...this:

Yep, I got a new computer and haven't mastered it yet. I am working on it, and it is so hard to play on a new computer...let me tell ya. *wink*  Even Paris can hardly stay awake.


The problem is that I haven't transferred my pictures over so I can't share any projects. I will get this done asap. Anyways, I need some advice on apps. What do you like, use, love, etc.? I'm open to any suggestions!

9.19.2011

Happy Fall Y'all

The first day of fall might not be until the 23rd, but I decided to finally be early on something and get my mantel looking a little more fall-ish...especially since it was still decorated in spring decor. Actually, it was a mixture of spring and summer. But that is no excuse, it looked not-put-together and was in need of serious attention. So I took 5 minutes to make it presentable.

I didn't want to go with traditional fall colors, pumpkins, or leaves. I did the traditional fall decor last year, so I thought a change was needed. This year I went with a neutral color palette with touches of warm, rustic colors.  Here is what I managed to rummage from the house:

The decor is simple...which is a change for me. Usually I really play it up with lots of colors and elements, but I really like the changes. On the left side, I staked some books and topped them with a twine-wrapped candle holder and a small brass owl. I also layered my diy chalkboard in front of a window. This chalkboard is an upcycled thrift store frame that I use and reuse for every season.

The right side of the mantel has a tall lantern with another twine-wrapped candle holder. Then I placed a glass full of corks on top of my vintage spool. Finally I hung a set of metal keys from the window with twine. 

Easy, easy, easy. And the decor is versatile enough to last through Thanksgiving. I don't plan to decorate for Halloween so I should be good to go for a few months...yay!

9.15.2011

Lavish

This post is going to be more diary-ish than any other. I'm typing what I feel. If you don't want to read my musings, then just click here for the website.

I always have ideas running through my head. It is part of the reason why I don't sleep well at night, I can't turn the brain off. And one idea/dream has really stuck with me - having a funky boutique with lots of charm called Lavish. I finally feel like I am being led along this path and that my dream could actually become a reality. I don't know what will come of it, but if I don't start walking towards it, I will never make it.

It started out with this blog, my first public appearance and showing of DIY projects and decor. It was scary, still is sometimes, to put my house and life out for public viewing and comments. But I have loved every second of it and each comment makes me smile, even if some aren't the nicest. It seems like everyone loves my thrifty repurposing and furniture rehabs. Truth is, most of the furniture rehabs aren't for my house...they are just because I love to fix something up. They sit in my garage, at my parents' house, or in the storage unit collecting dust.

So I have just been living life and blogging a little when a friend told me that I should sign up for a booth at EcoFest, which I did. Moment of madness? Anyways, I worked and worked (and recruited my parents to work and work) to get ready. I had no clue who would come, what would happen, or if I would even have anyone enter my booth. There was no turning back though - I paid my booth fee and was testing the waters a little deeper with an actual booth, not just pictures online.

And you know what? The booth was a hit! Everyone loved the items, said the booth was the "must see", and continually asked where my store front was. Did you catch that....where is my store! I was over the moon because actually hearing the words from complete strangers gave me a huge leap towards my dream, not just a step. That huge leap is confidence. Now I know that I can do this.

To continue along the path, I now have a website for Lavish. A bonafide, grown-up, .com website - www.lavishyou.com. The site has information about furniture rehabs and e-decorating, but still needs a lot of work. (It is brand new, cut me a little slack.) The plan is to modify the site to fit my *hopefully* ever-growing business and one-day store front. I would be so happy if you would hop on over to Lavish and take a look around. Please let me know what you think...be it good or bad.

What does the future hold? I have no idea. But I do know that there will be some major life changing decisions and moments in the year to come. I am going to continue walking down the dream path, side-by-side with my family, and see where it takes us.

9.14.2011

Pictures Of My Booth

Well, last weekend was EcoFest which means that it was the debut of my new business, Lavish. So I thought I would share a few photos from EcoFest with y'all.


And the obligatory first customer picture:

9.13.2011

Projector Screen Upcycle

I love chalkboards, it is no secret. They are versatile and perfect for my ever-changing-moods. So when it came to a sign for my booth, I knew that a chalkboard was the way to go. I had planned to upcycle a large picture frame into a chalkboard, but then one of my projects went a little wrong and I ended up with a projector screen that is perfect for a chalkboard sign!

My original plan was to make the projector screen base the tripod lamp. That plan went out the window when I couldn't get the screen separated from the base with my small arsenal of tools. I was bummed out until I found the music stand and turned it into the tripod lamp, freeing up the projector screen for another project - a chalkboard.

I'm sure y'all know how to make a chalkboard, but in case you don't... just paint chalkboard paint onto whatever you want. (Preferably not live things.) I laid out the projector screen in the garage and went to town painting.

The projector screen was perfect for my booth since it is lightweight and compact. Plus I can change the wording and use it in my craft room too. And the screen was only $5 at a thrift store. I am giddy with all the possibilities of my new five dollar chalkboard. Here is the upcycled projector screen in action, with me sitting on a fabulous repurposed bench (and ignore my mom's finger):

9.12.2011

Stamp Making

Even though I used to scrapbook, I have never once thought about making a personalized stamp. To tell the truth, I didn't even know you could make stamps until about a week ago - yep, I might have been living under a rock. But after making my free paint chip business cards, I was in desperate need of a stamp.

I looked online and was going to buy a stamp, but I wasn't too thrilled with the idea of spending about $25 dollars on a stamp that I might not use a lot since this is a trial run. So with a little google-ing and pinterest-ing, I decided to DIY a stamp. The supplies needed to make a stamp are carving tools, pencil, and stamp carving block. I picked up everything at Hobby Lobby while it was 30% off.

First step is to get the graphic onto the carving block. I used the old pencil and trace method to transfer an image. Be sure that you make the graphic reverse since it will stamp backwards.

There are two different ways to carve a stamp - one is the graphic sticks out (like normal stamps where you only see the graphic when stamped) and the other is the graphic is carved in and the background is the ink color when stamped. That explanation is bad, but I carved both ways and like the not-normal stamp better.

After your graphic is transferred, get to carving. I found that it works best to use the smalled carving tool to outline the graphic first. Then use the larger tools to cut away the big sections. Also, turn the carving block instead of the carving tools. Trust me, you can get more detailed by turning the block.

Carving didn't take long. I made two different stamps in about 20 minutes...not too bad for a first timer. The hardest to carve was the more detailed one, of course. And my stamps are on the small size since the paint chips are business card size.


Now I need to make a stamp for the backside of the cards with the website and contact info. Shouldn't be hard to do now that I know how. Have y'all made any stamps?

Psst - I watched this video to help me get started - it is long but detailed. I didn't record making my stamps since I don't have a tripod and need two hands to carve.

9.01.2011

Outside House Tour

I have had a few people remind me that I don't have many, if any, pictures of the outside of my casa. Well, that is because the outside receives minimal love and has a to-do list a mile long. I've been busy at work on the inside and only remember to mow the grass when I can't find Paris in it. Okay, it isn't that bad, but the yard is in an embarrassingly sad shape.

So to appease the masses (all 3 of you) I decided to make a video tour of the outside. Please note that my appearance is seriously lacking since I was doing yard work in 100 degrees at the time of this video. Without further ado, the much-awaited, completely unedited video:

Things to note:
  • Can't hear me talking at the beginning. The wind didn't want to play nice while I tried to film.
  • Weed beds, not flower beds. They are more like jungle beds...maybe that is the new eco-friendly design? These really must get attention soon.
  • Number of crepe myrtles. There must have been a mad sale on them because there are 9 of them in our yard. Yep, 9! And I have successfully killed two of them already.
  • Monkey grass everywhere. Must have been on sale just like the crepe myrtles. I hate the stuff and think it make that house look dated, not to mention the bugs and snakes (eek!) that could live in it.
  • My spray painting area is well used. I would love to have an actual spray booth, but until I get my dream home, the cast off mirror and plant stand will work nicely.
  • The video quality is bad. I saved it in a web format so it would load up quicker.
  • Anyways seems to be the word of the day.
Anyways, (he he) I need your help and ideas for my plea about the back yard. We want to connect the patio to the master bed door since the door currently steps out into the yard. The plan is to cover the existing concrete patio or tear it out. What thinks y'all?

8.30.2011

Paint Chip Business Cards {DIY}

Since I am venturing out into the world with items for sale, I probably need business cards. And since I am a DIYer, I wanted to try my hand at making my own business card. So I started brain storming ideas and landed on paint chips - they are colorful and a good representation of my business. Plus I have a ton of them laying around the house, and I can always make a trip to the store to get a few more if need be.

To make my business cards, I used Valspar 6-color chips. They are the perfect size. You will need paint chips, scrap paper, and a stapler - I forgot to mention that these are also note pads...yay for double duty items!

First, fold the smallest color over to make a flap. Then put about 8 pieces of paper under the flap:

Staple:

Finally, just fold over the rest of the paint chip and tuck it under the little flap:


So easy, so fast, and so FREE!!! But you are probably saying to yourself "those don't have any info on them..." I know, that is the second part of the project - stamping the cards. And since I am a DIYer, I wanted to try my hand at making my own stamp too. Which I succeeded at. So details on a DIY stamp is coming your way.

Any business card makers out there? Or have you seen any unique ideas that you care to share?

And these are the business cards that I am using at the moment. They were inspired by EcoFest since it is all about the environment and being "green". I bet the business card design will change as my business develops...but I probably will always have the little paint chip note pads around since they are cute, and people love free items.

8.29.2011

Built A Sewing Machine Cabinet

I have slowly started sewing more and more. And the console table that I have been using to house my sewing machine is not very practical. Yes, a console table. It is great for the length, but it is a little high and it is a lot too big for the guest bedroom. So, I decided I would build a cabinet. I have had success with a headboard and a desk, so why not a sewing cabinet?! My inspiration for the cabinet came from my friend's folding IKEA table in her kitchen. It has great storage and folding leaves, which seems perfect for this project.

First I measured my sewing machine to see how large the cabinet needed to be - about 20" deep. Then it was time to cut the plywood - two sides, the bottom, a shelf, the top, and one leaf.


Then I drilled pilot holes and drilled out enough room to counter-sink the screws.

Now it was time to assemble the box. I used a little wood glue and a few screws to hold the box together. First I installed the sides to the bottom piece. Then I installed the shelf, and then the top. So I worked from the bottom up. And here is my secret - I used a saw horse to keep the side pieces stable since I only have two arms.

Once this was built, I flipped it over to install the leaf. I hinged the leaf so it would hang to the side when not in use. This makes the foot-print of the cabinet much smaller, but I can easily raise the leaf when I am sewing.

Now the box is built! I filled the holes with wood filler and then primed and painted it.

But, I don't like the finished product. Not because of the box or construction of it...but because I am not happy with the guest room / craft room. It isn't working for me, it seems like I am working for it. So, this box might or might not stick around because a desk overhaul is in the works. And I am not using the cabinet to sew with...it has become a storage cabinet - prepare for a scary photo:

The cabinet houses paint supplies and canvas, as well as a few to-do projects on the top. I have the sewing machine on my desk. Building the cabinet was good practice, but not the right solution for my space since it isn't being used for the intended purpose. Back to the drawing board...or pinterest for inspiration.

8.25.2011

EcoFest

I'm finally doing it. This dog and pony show of mine is hitting the road and hoping to make it. In English - I signed up for a booth at the upcoming EcoFest in Conway on September 10th. It is a little scary, stepping out into the big world and putting my wares out for public viewing and, hopefully, sale. But it is time. I have been hoarding items and rehabbing them with passion. Now, I am going to test the waters with the buying public.

I have lots of ideas and projects up my sleeve for EcoFest. From my repurposed business cards, to my booth decor and items, I will share it here. And in the spirit of sharing, here are some projects I've been busy with:


Plus tons more!! I have plenty of projects to talk about, I just need to put the paint brush down long enough to actually get them loaded on the ol' blog. Think I might be entering the blog-burn-out stage where I can't seem to get the posts online. Someone please light a fire under me and get me going again. Or maybe I just need another red bull!

8.23.2011

Tripod Lamp From Music Stand - DIY

When I found a rusty music stand at a yard sale for $1, I instantly knew that it would be my new lamp. Well, I knew that I was going to try to make it a lamp. I haven't ever made a lamp...until now. And the best part is that this is an easy project and can be done quickly.

You will need a stand, and a lamp kit. (Plus a bulb if you want it to shine, and a lampshade if you choose.) And yes, that is the old range and a messy dining room. In my defense, I "lost" my camera and I don't stage photos, I just take them.

First, open the package. Ha! I'm not going to be that detailed. Really first, run the wire from the lamp kit up the center tube of the music stand.

Then you want to put on the bottom piece that holds the harp. Don't know what it is technically named, but be sure to put it on first, before you wire up the socket. Trust me on this, I wired the socket up first and had to take it apart to put the harp holder on. Lesson learned.

Now wire up the socket. Take apart the socket so you can see the two screws. Then screw one wire to each of the screws and tighten them down. My electrician hubby would probably school me on to the proper electrical current and terminals...but he wasn't home and I did it all by myself with no teaching.

It is time to see if your wiring-work is legit. Screw a bulb into the socket and plug it in - be sure to place the cover of the screws so you don't get shocked! (Again, trust me on this. First time I have ever been zapped and it made me laugh, but this is no joking matter. Hubs would have shut the job down if he knew that last piece of info.)

If you are lucky, the bulb will shine. Woot for apprentice electricians, and/or DIY divas! Anyways, now you want to glue the harp holder and socket to the top of the tripod.

After it is dry, install the harp and lampshade. Then you have your very own tripod lamp.

Total project costs - $1. I already had the shade ($2 from a thrift store, that will be recovered) and a lamp kit, from this lamp project gone wrong. One whole dollar for a room-warming, corner-brightening, rusty-goodness lamp. I love it!

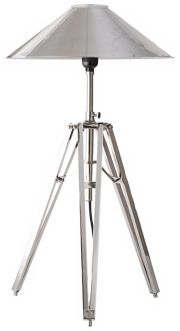
Pssst - I took to Google to see just how much money I saved on this DIY. Looks like hundreds...
Tripod Metal Desk Lamp
$369.91 from Lamps Plus

8.17.2011

Cutting Up The Hi-Macs, DIY-style

The new-to-us range that I bought from the Habitat Restore is larger than our current slide-in range, which means the counter tops have to be cut. I knew this was coming - when we had the LG hi-macs installed, they told us that the range we had was 27" and the standard size is 30" for a slide-in range. The installers said to call them back when I got a new stove and they would cut the counter tops for me. Perfect...until they quoted me $100. Yikes! It was time to cut the counter tops ourselves.

My only worry about DIY- cutting the solid surface hi-macs was the warranty. So I called Lowe's (where we bought them from) and asked about the warranty - and to my surprise, cutting the counter tops for the range wouldn't void the warranty. But, if we messed up and cut wrong, the warranty wouldn't cover it. No pressure, right?! So what does a girl do? Call her dad. And he gladly agreed to help and bring his rotozip (which is an amazing tool, and I think I need one).

Now for the fun part - actually cutting the solid surface counter tops. The tool of choice is a rotozip with a sc5 bit. First we measured and marked the cut lines. And then we measured again. And once more for good measure, pun intended. I say we, but these are obviously not my hands, they are dad's:

Then we lined up the square to use as a cut-line guide. (Actually, dad lined up the square. I was moral support.) And secured the square with tape and clamps.

The bit of the rotozip is one inch from the outside cage/protector-thing. So the square is lined up one inch away from the cut line. Look closely, you can barely see the pencil mark in the photo above. Then the rotozip can be ran along the square to ensure that the cut line is straight and staying on track. Like so:

I suggest watching the video without sound...it is loud since the rotozip is on. The rotozip will eat through the solid surface easily and spit out tons of white dust/confetti-like pieces.

Dad ran the rotozip down the length of the square. When he got to the end, we moved the square and then secured it with tape. We continued around the perimeter - he working the rotozip, and me holding the square and blowing away the white dust - until the counter tops were cut.

Then it was time to bring in the new range and watch my electrician hubby work. Side note - I just noticed that you can see the old hardwood color where he is sitting, and then the new dark walnut color in the top left. I hope no one ever pulls out the range because I didn't refinish the hardwood under the range.

After he worked his magic on the out-of-code wiring and hooked up the range, I jumped for joy and gave everyone hugs. I am so excited about the new range and love how it updates the kitchen...all for 225 bucks! Money well spent.


Here is a side-by-side of the old and new ranges:

Three cheers to the Habitat Restore! And three cheers to my dad! I'm not planning on cutting any more on the counter tops...but now I know how-to just in case. Have you cut on your counter tops? Do you need a rotozip too?